
Use.GPU Goes Trad
Old is new again

I've released a new version of Use.GPU, my experimental reactive/declarative WebGPU framework, now at version 0.8.
My goal is to make GPU rendering easier and more sane. I do this by applying the lessons and patterns learned from the React world, and basically turning them all up to 11, sometimes 12. This is done via my own Live run-time, which is like a martian React on steroids.
The previous 0.7 release was themed around compute, where I applied my shader linker to a few challenging use cases. It hopefully made it clear that Use.GPU is very good at things that traditional engines are kinda bad at.
In comparison, 0.8 will seem banal, because the theme was to fill the gaps and bring some traditional conveniences, like:
- Scenes and nodes with matrices
- Meshes with instancing
- Shadow maps for lighting
- Visibility culling for geometry

These were absent mostly because I didn't really need them, and they didn't seem like they'd push the architecture in novel directions. That's changed however, because there's one major refactor underpinning it all: the previously standard forward renderer is now entirely swappable. There is a shiny deferred-style renderer to showcase this ability, where lights are rendered separately, using a g-buffer with stenciling.
This new rendering pipeline is entirely component-driven, and fully dogfooded. There is no core renderer per-se: the way draws are realized depends purely on the components being used. It effectively realizes that most elusive of graphics grails, which established engines have had difficulty delivering on: a data-driven, scriptable render pipeline, that mortals can hopefully use.
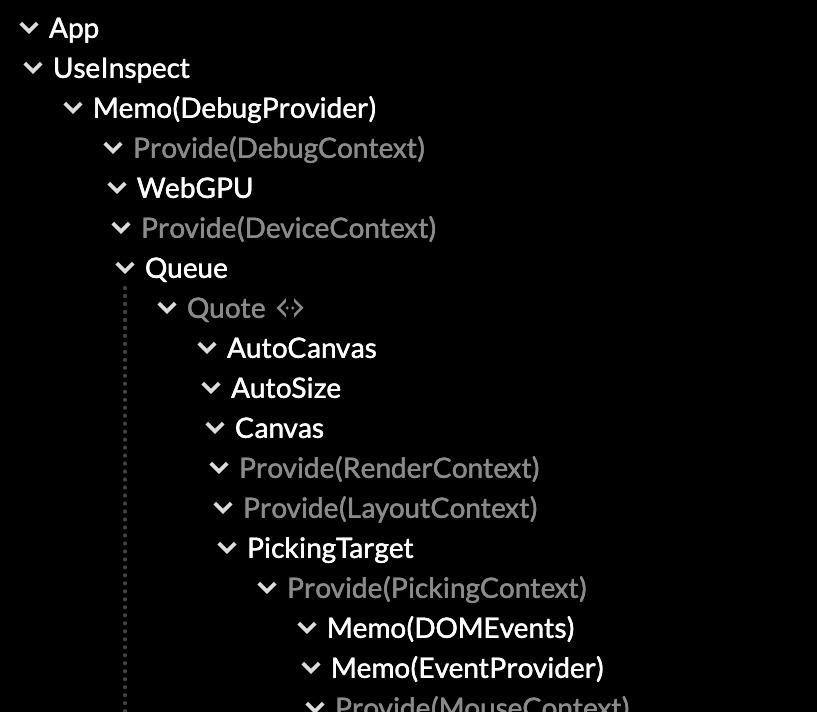
Root of the App
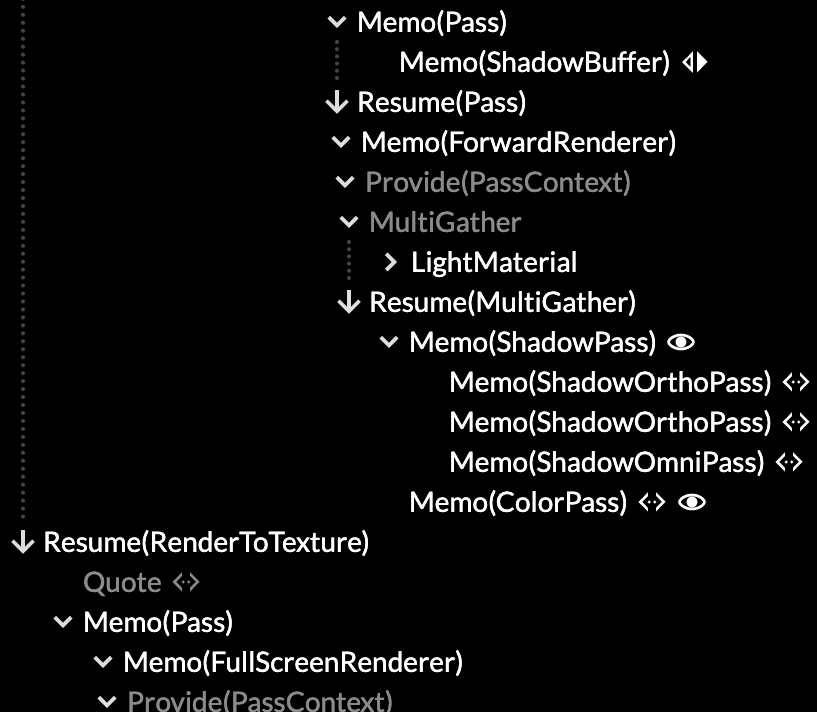
Deep inside the tree
I've spent countless words on Use.GPU's effect-based architecture in prior posts, which I won't recap. Rather, I'll just summarize the one big trick: it's structured entirely as if it needs to produce only 1 frame. Then in order to be interactive, and animate, it selectively rewinds parts of the program, and reactively re-runs them. If it sounds crazy, that's because it is. And yet it works.
So the key point isn't the feature list above, but rather, how it does so. It continues to prove that this way of coding can pay off big. It has all the benefits of immediate-mode UI, with none of the downsides, and tons of extensibility. And there are some surprises along the way.
Real Reactivity
You might think: isn't this a solved problem? There are plenty of JS 3D engines. Hasn't React-Three-Fiber (R3F) shown how to make that declarative? And aren't these just web versions of what native engines like Unreal and Unity already do well, and better?
My answer is no, but it might not be clear why. Let me give an example from my current job.
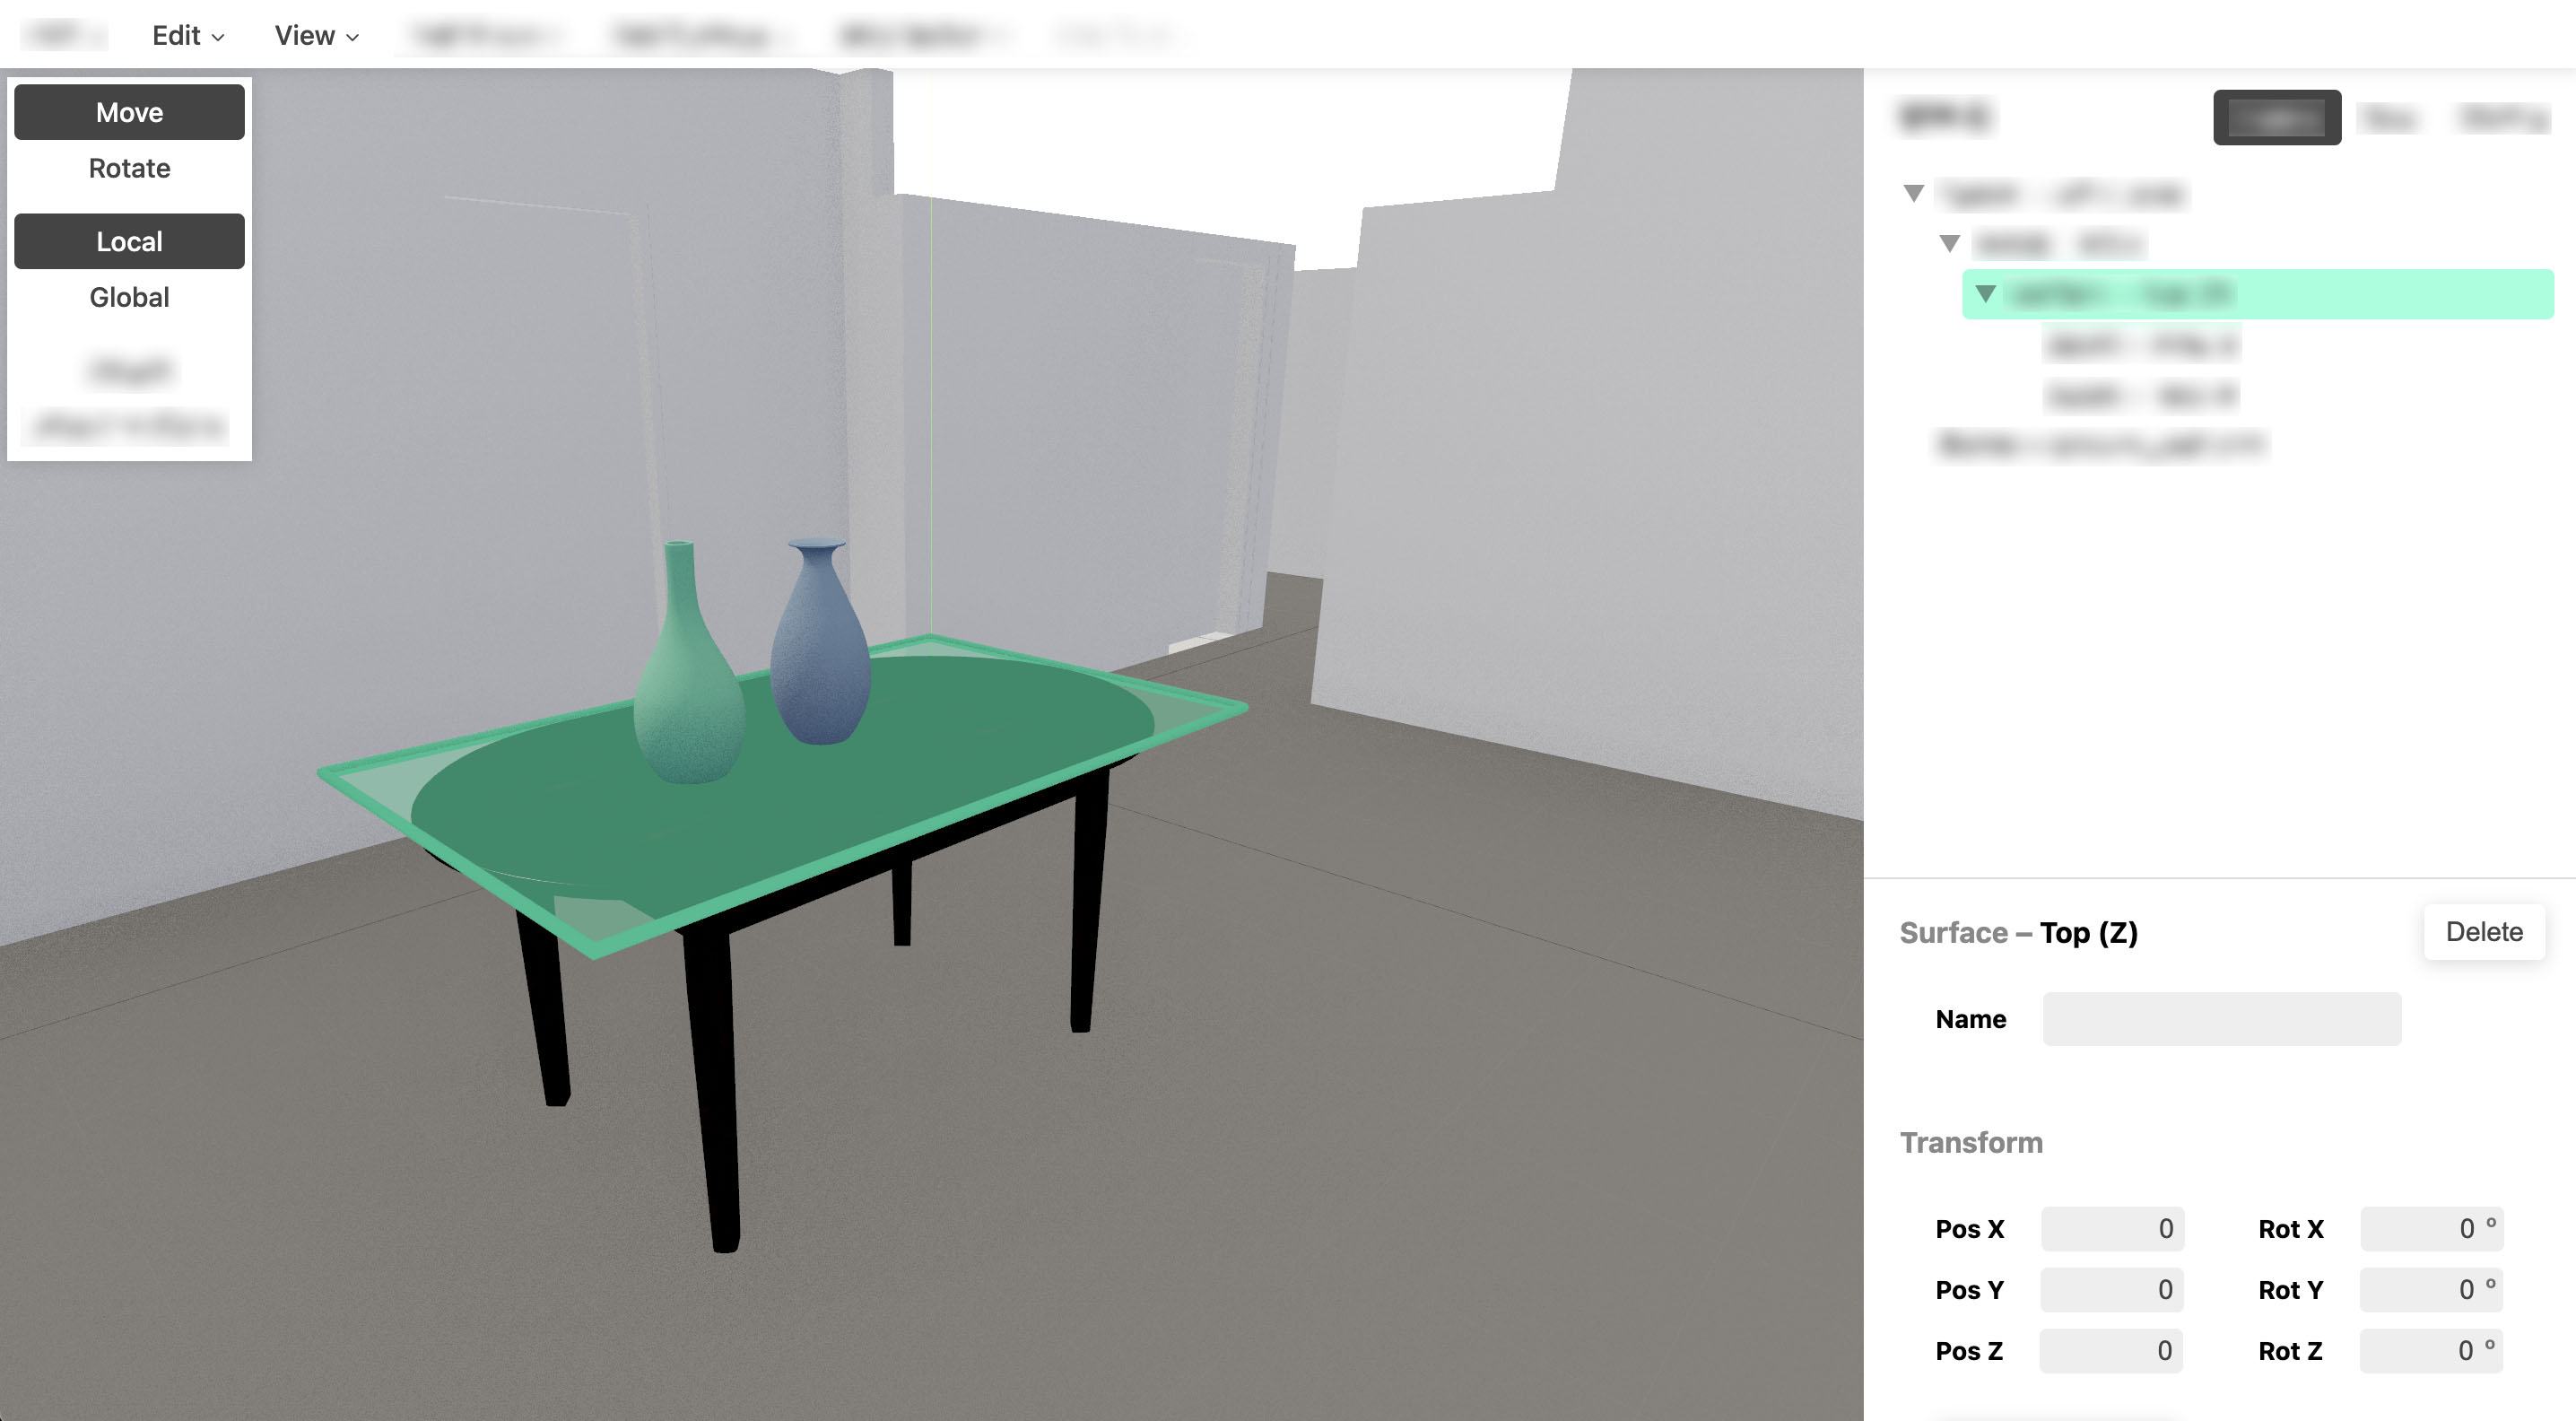
My client needs a specialized 3D editing tool. In gaming terms you might think of it as a level design tool, except the levels are real buildings. The details don't really matter, only that they need a custom 3D editing UI. I've been using Three.js and R3F for it, because that's what works today and what other people know.
Three.js might seem like a great choice for the job: it has a 3D scene, editing controls and so on. But, my scene is not the source of truth, it's the output of a process. The actual source of truth being live-edited is another tree that sits before it. So I need to solve a two-way synchronization problem between both. This requires careful reasoning about state changes.
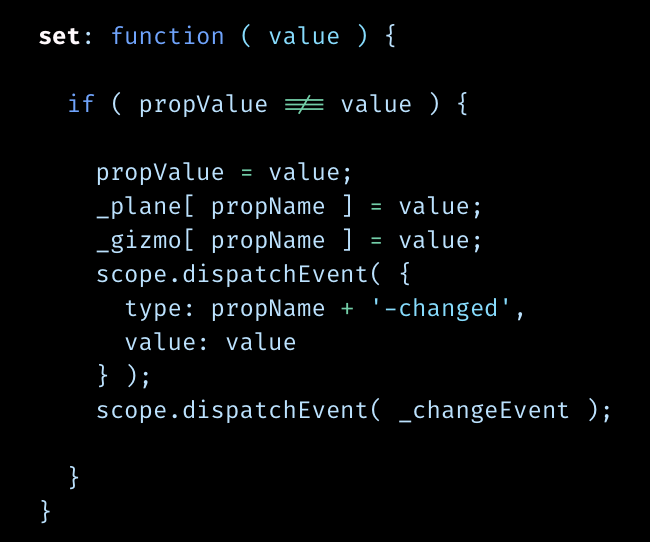
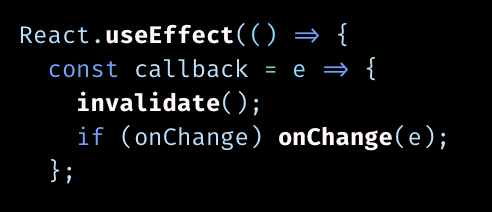
Change handlers in Three.js and R3F
Sadly, the way Three.js responds to changes is ill-defined. As is common, its objects have "dirty" flags. They are resolved and cleared when the scene is re-rendered. But this is not an iron rule: many methods do trigger a local refresh on the spot. Worse, certain properties have an invisible setter, which immediately triggers a "change" event when you assign a new value to it. This also causes derived state to update and cascade, and will be broadcast to any code that might be listening.
The coding principle applied here is "better safe than sorry". Each of these triggers was only added to fix a particular stale data bug, so their effects are incomplete, creating two big problems. Problem 1 is a mix of old and new state... but problem 2 is you can only make it worse, by adding even more pre-emptive partial updates, sprinkled around everywhere.
These "change" events are oblivious to the reason for the change, and this is actually key: if a change was caused by a user interaction, the rest of the app needs to respond to it. But if the change was computed from something else, then you explicitly don't want anything earlier to respond to it, because it would just create an endless cycle, which you need to detect and halt.
R3F introduces a declarative model on top, but can't fundamentally fix this. In fact it adds a few new problems of it own in trying to bridge the two worlds. The details are boring and too specific to dig into, but let's just say it took me a while to realize why my objects were moving around whenever I did a hot-reload, because the second render is not at all the same as the first.
Yet this is exactly what one-way data flow in reactive frameworks is meant to address. It creates a fundamental distinction between the two directions: cascading down (derived state) vs cascading up (user interactions). Instead of routing both through the same mutable objects, it creates a one-way reverse-path too, triggered only in specific circumstances, so that cause and effect are always unambigious, and cycles are impossible.
Three.js is good for classic 3D. But if you're trying to build applications with R3F it feels fragile, like there's something fundamentally wrong with it, that they'll never be able to fix. The big lesson is this: for code to be truly declarative, changes must not be allowed to travel backwards. They must also be resolved consistently, in one big pass. Otherwise it leads to endless bug whack-a-mole.
What reactivity really does is take cache invalidation, said to be the hardest problem, and turn the problem itself into the solution. You never invalidate a cache without immediately refreshing it, and you make that the sole way to cause anything to happen at all. Crazy, and yet it works.
When I tell people this, they often say "well, it might work well for your domain, but it couldn't possibly work for mine." And then I show them how to do it.
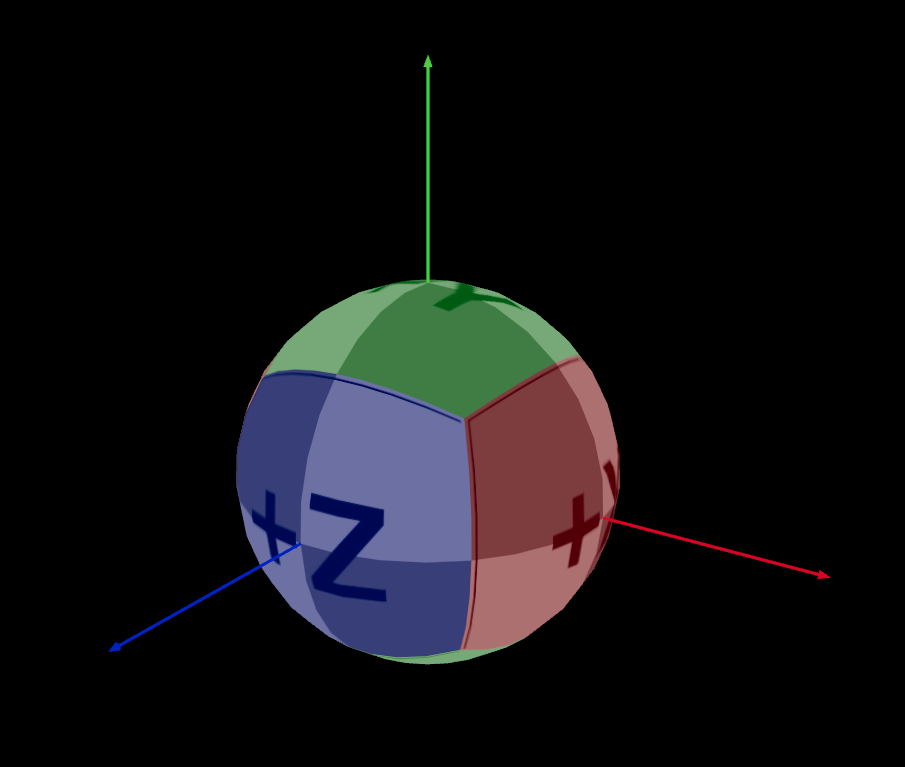
Figuring out which way your cube map points:
just gfx programmer things.
And... Scene
One of the cool consequences of this architecture is that even the most traditional of constructs can suddenly bring neat, Lispy surprises.
The new scene system is a great example. Contrary to most other engines, it's actually entirely optional. But that's not the surprising part.
Normally you just have a tree where nodes contain other nodes, which eventually contain meshes, like this:
<Scene>
  <Node matrix={...}>
    <Mesh>
    <Mesh>
  <Node matrix={...}>
    <Mesh>
    <Node matrix={...}>
      <Mesh>
      <Mesh>
It's a way to compose matrices: they cascade and combine from parent to child. The 3D engine is then built to efficiently traverse and render this structure.
But what it ultimately does is define a transform for every mesh: a function vec3 => vec3 that maps one vertex position to another. So if you squint, <Mesh> is really just a marker for a place where you stop composing matrices and pass a composed matrix transform to something else.
Hence Use.GPU's equivalent, <Primitive>, could actually be called <Unscene>. What it does is escape from the scene model, mirroring the Lisp pattern of quote-unquote. A chain of <Node> parents is just a domain-specific-language (DSL) to produce a TransformContext with a shader function, one that applies a single combined matrix transform.
In turn, <Mesh> just becomes a combination of <Primitive> and a <FaceLayer>, i.e. triangle geometry that uses the transform. It all composes cleanly.
So if you just put meshes inside the scene tree, it works exactly like a traditional 3D engine. But if you put, say, a polar coordinate plot in there from the plot package, which is not a matrix transform, inside a primitive, then it will still compose cleanly. It will combine the transforms into a new shader function, and apply it to whatever's inside. You can unscene and scene repeatedly, because it's just exiting and re-entering a DSL.
In 3D this is complicated by the fact that tangents and normals transform differently from vertices. But, this was already addressed in 0.7 by pairing each transform with a differential function, and using shader fu to compose it. So this all just keeps working.
Another neat thing is how this works with instancing. There is now an <Instances> component, which is exactly like <Mesh>, except that it gives you a dynamic <Instance> to copy/paste via a render prop:
<Instances
   mesh={mesh}
   render={(Instance) => (<>
     <Instance position={[1, 2, 3]} />
     <Instance position={[3, 4, 5]} />
   </>)
 />
As you might expect, it will gather the transforms of all instances, stuff all of them into a single buffer, and then render them all with a single draw call. The neat part is this: you can still wrap individual <Instance> components in as many <Node> levels as you like. Because all <Instance> does is pass its matrix transform back up the tree to the parent it belongs to.
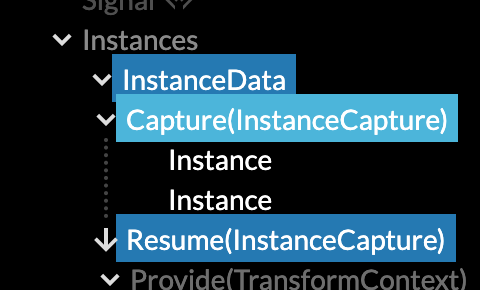
This is done using Live captures, which are React context providers in reverse. It doesn't violate one-way data flow, because captures will only run after all the children have finished running. Captures already worked previously, the semantics were just extended and formalized in 0.8 to allow this to compose with other reduction mechanisms.
But there's more. Not only can you wrap <Instance> in <Node>, you can also wrap either of them in <Animate>, which is Use.GPU's keyframe animator, entirely unchanged since 0.7:
<Instances
  mesh={mesh}
  render={(Instance) => (

    <Animate
      prop="rotation"
      keyframes={ROTATION_KEYFRAMES}
      loop
      ease="cosine"
    >
      <Node>
        {seq(20).map(i => (
          <Animate
            prop="position"
            keyframes={POSITION_KEYFRAMES}
            loop
            delay={-i * 2}
            ease="linear"
          >
            <Instance
              rotation={[
                Math.random()*360,
                Math.random()*360,
                Math.random()*360,
              ]}
              scale={[0.2, 0.2, 0.2]}
            />
          </Animate>
        ))}
      </Node>
    </Animate>

  )}
/>
The scene DSL and the instancing DSL and the animation DSL all compose directly, with nothing up my sleeve. Each of these <Components> are still just ordinary functions. On the inside they look like constructors with all the other code missing. There is zero special casing going on here, and none of them are explicitly walking the tree to reach each other. The only one doing that is the reactive run-time... and all it does is enforce one-way data flow by calling functions, gathering results and busting caches in tree order. Because a capture is a long-distance yeet.
Personally I find this pretty magical. It's not as efficient as a hand-rolled scene graph with instancing and built-in animation, but in terms of coding lift it's literally O(0) instead of OO. I needed to add zero lines of code to any of the 3 sub-systems, in order to combine them into one spinning whole.
The entire scene + instancing package clocks in at about 300 lines and that's including empties and generous formatting. I don't need to architect the rest of the framework around a base Object3D class that everything has to inherit from either, which is a-ok in my book.
This architecture will never reach Unreal or Unity levels of hundreds of thousands of draw calls, but then, it's not meant to do that. It embraces the idea of a unique shader for every draw call, and then walks that back if and when it's useful. The prototype map package for example does this, and can draw a whole 3D vector globe in 2 draw calls: fill and stroke. Adding labels would make it 3. And it's not static: it's doing the usual quad-tree of LOD'd mercator map tiles.
Multi-Pass
Next up, the modular renderer passes. Architecturally and reactively-speaking, there isn't much here. This was mainly an exercise in slicing apart the existing glue.
The key thing to grok is that in Use.GPU, the <Pass> component does not correspond to a literal GPU render pass. Rather, it's a virtual, logical render pass. It represents all the work needed to draw some geometry to a screen or off-screen buffer, in its fully shaded form. This seems like a useful abstraction, because it cleanly separates the nitty gritty rendering from later compositing (e.g. overlays).
For the forward renderer, this means first rendering a few shadow maps, and possibly rendering a picking buffer for interaction. For the deferred renderer, this involves rendering the g-buffer, stencils, lights, and so on.
My goal was for the toggle between the two to be as simple as replacing a <ForwardRenderer> with a <DeferredRenderer>... but also to have both of those be flexible enough that you could potentially add on, say, SSAO, or bloom, or a Space Engine-style black hole, as an afterthought. And each <Pass> can have its own renderer, rather than shoehorning everything into one big engine.
Neatly, that's mostly what it is now. The basic principle rests on three pillars.
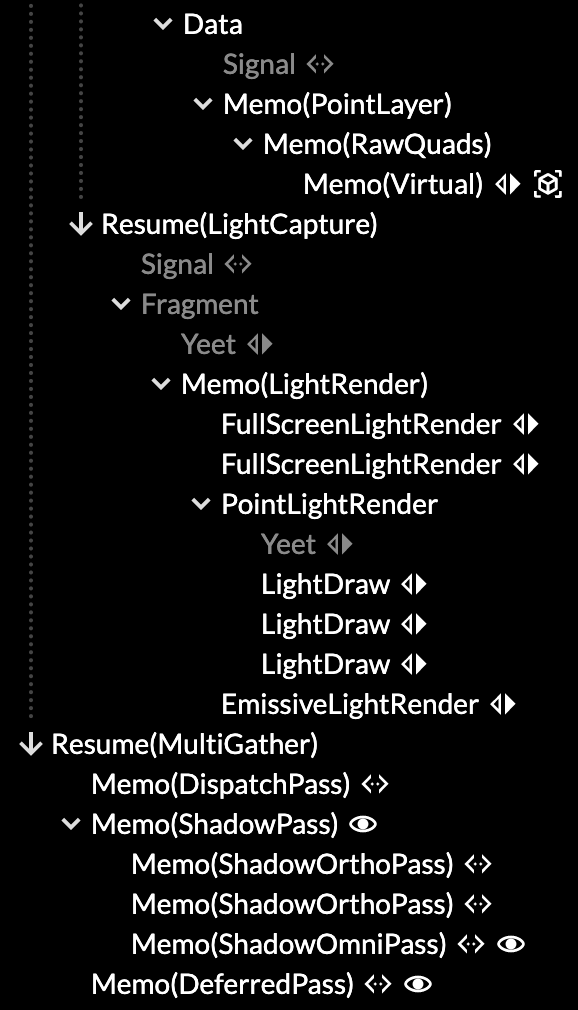
Deferred rendering
First, there are a few different rendering modes, by default solid vs shaded vs ui. These define what kind of information is needed at every pixel, i.e. the classic varying attributes. But they have no opinion on where the data comes from or what it's used for: that's defined by the geometry layer being rendered. It renders a <Virtual> draw call, which it gives e.g. a getVertex and getFragment shader function with a particular signature for that mode. These functions are not complete shaders, just the core functions, which are linked into a stub. There are a few standard 'tropes' used here, not just these two.
Second, there are a few different rendering buckets, like opaque, transparent, shadow, picking and debug. These are used to group draws into. Different GPU render passes then pick and choose from that. opaque and transparent are drawn to the screen, while shadow is drawn repeatedly into all the shadow maps. This includes sorting front-to-back and back-to-front, as well as culling.
Finally, there's the renderer itself (forward vs deferred), and its associated pass components (e.g. <ColorPass>, <ShadowPass>, <PickingPass>, and so on). The renderer decides how to translate a particular "mode + bucket" combination into a concrete draw call, by lowering it into render components (e.g. <ShadedRender>). The pass components decide which buffer to actually render stuff to, and how. So the renderer itself doesn't actually render, it merely spawns and delegates to other components that do.
The forward path works mostly the same as before, only the culling and shadow maps are new... but it's now split up into all its logical parts. And I verified this design by adding the deferred renderer, which is a lot more convoluted, but still needs to do some forward rendering.
It works like a treat, and they use all the same lighting shaders. You can extend any of the 3 pillars just by replacing or injecting a new component. And you don't need to fork either renderer to do so: you can just pick and choose à la carte by selectively overriding or extending its "mode + bucket" mapping table, or injecting a new actual render pass.
To really put a bow on top, I upgraded the Use.GPU inspector so that you can directly view any render target in a RenderDoc-like way. This will auto-apply useful colorization shaders, e.g. to visualize depth. This is itself implemented as a Use.GPU Live canvas, sitting inside the HTML-based inspector, sitting on top of Live, which makes this a Live-in-React-in-Live scenario.
For shits and giggles, you can also inspect the inspector's canvas, recursively, ad infinitum. Useful for debugging the debugger:
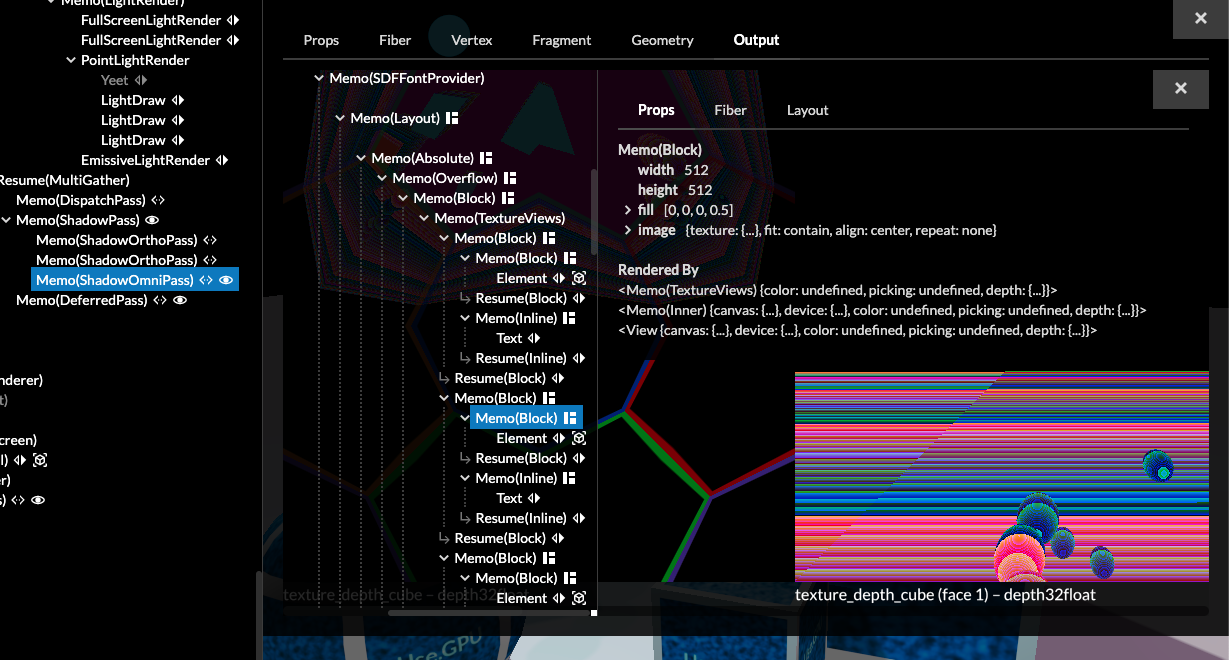
There are still of course some limitations. If, for example, you wanted to add a new light type, or add support for volumetric lights, you'd have to reach in more deeply to make that happen: the resulting code needs to be tightly optimized, because it runs per pixel and per light. But if you do, you're still going to be able to reuse 90% of the existing components as-is.
I do want a more comprehensive set of light types (e.g. line and area), I just didn't get around to it. Same goes for motion vectors and TXAA. However, with WebGPU finally nearing public release, maybe people will actually help out. Hint hint.
Port of a Reaction Diffusion system by Felix Woitzel.
A Clusterfuck of Textures
A final thing to talk about is 2D image effects and how they work. Or rather, the way they don't work. It seems simple, but in practice it's kind of ludicrous.
If you'd asked me a year ago, I'd have thought a very clean, composable post-effects pipeline was entirely within reach, with a unified API that mostly papered over the difference between compute and render. Given that I can link together all sorts of crazy shaders, this ought to be doable.
Well, I did upgrade the built-in fullscreen conveniences a bit, so that it's now easier to make e.g. a reaction diffusion sim like this (full code):
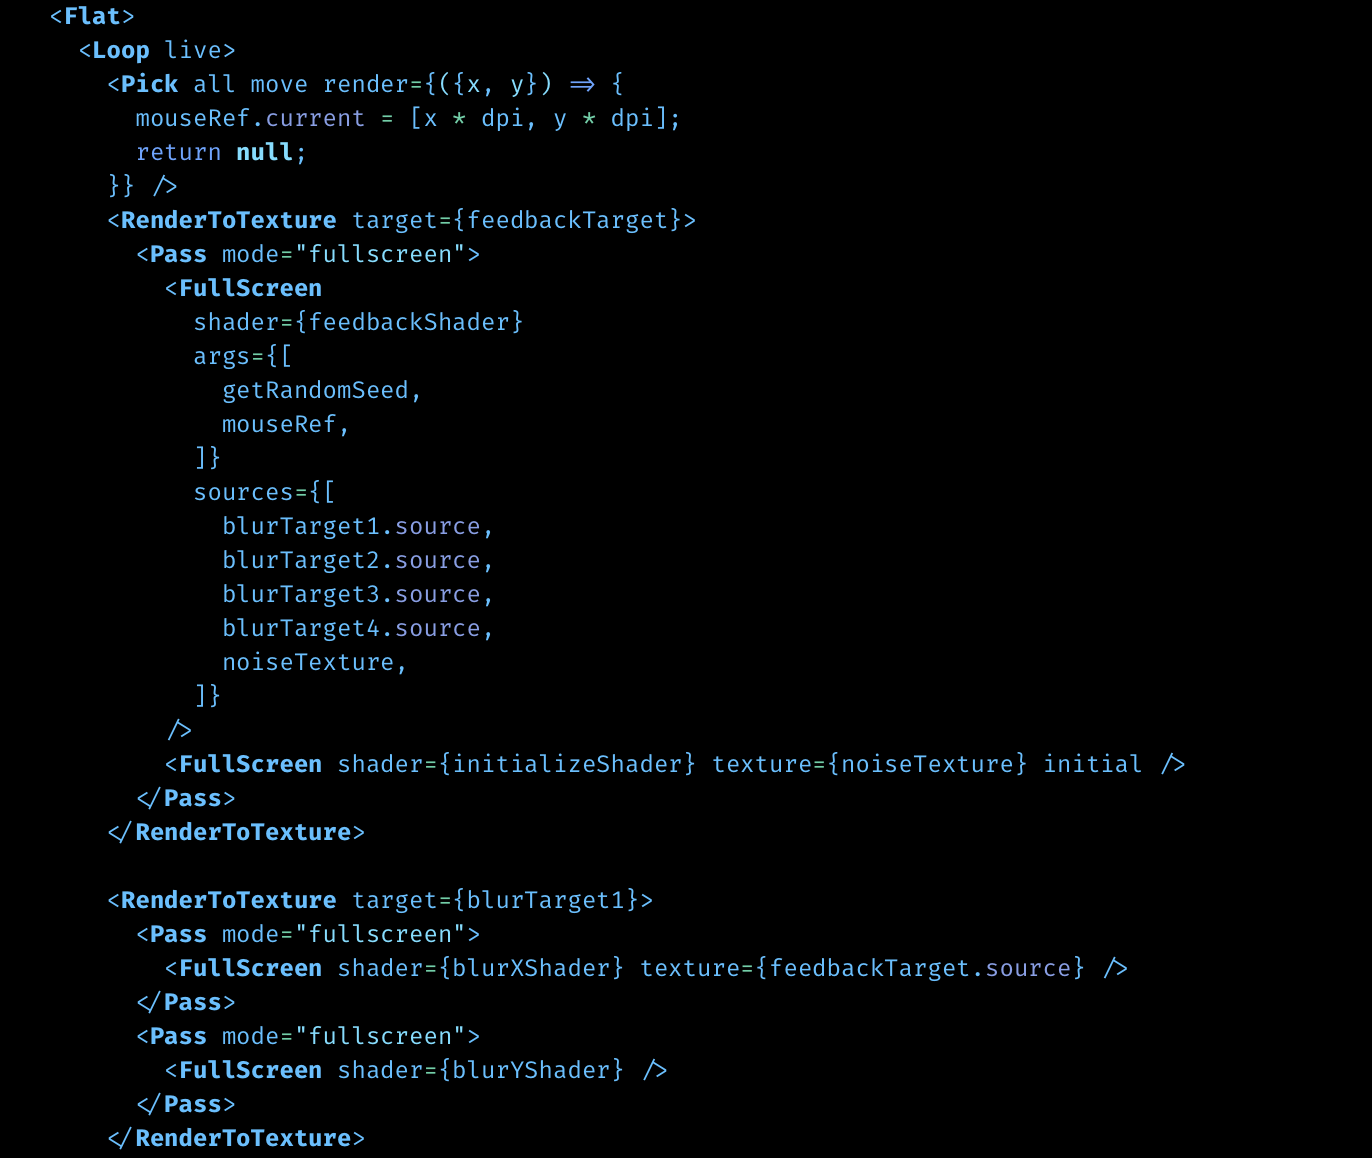
The devil here is in the details. If you want to process 2D images on a GPU, you basically have several choices:
- Use a compute shader or render shader?
- Which pixel format do you use?
- Are you sampling one flat image or a MIP pyramid of pre-scaled copies?
- Are you sampling color images, or depth/stencil images?
- Use hardware filtering or emulate filtering in software?
The big problem is that there is no single approach that can handle all cases. Each has its own quirks. To give you a concrete example: if you wrote a float16 reaction-diffusion sim, and then decided you actually needed float32, you'd probably have to rewrite all your shaders, because float16 is always renderable and hardware filterable, but float32 is not.
Use.GPU has a pretty nice set of Compute/Stage/Kernel components, which are elegant on the outside; but they require you to write pretty gnarly shader code to actually use them. On the other side are the RenderToTexture/Pass/FullScreen components which conceptually do the same thing, and have much nicer shader code, but which don't work for a lot of scenarios. All of them can be broken by doing something seemingly obvious, that just isn't natively supported and difficult to check ahead of time.
Even just producing universal code to display any possible texture type on screen becomes a careful exercise in code-generation. If you're familiar with the history of these features, it's understandable how it got to this point, but nevertheless, the resulting API is abysmal to use, and is a never-ending show of surprise pitfalls.
Here's a non-exhaustive list of quirks:
- Render shaders are the simplest, but can only be used to write those pixel formats that are "renderable".
- Compute shaders must be dispatched in groups of N, even if the image size is not a multiple of N. You have to manually trim off the excess threads.
- Hardware filtering only works on some formats, and some filtering functions only work in render shaders.
- Hardware filtering (fast) uses [0..1] UV float coordinates, software emulation in a shader (slow) uses [0..N] XY uint coordinates.
- Reading and writing from/to the same render texture is not allowed, you have to bounce between a read and write buffer.
- Depth+stencil images have their own types and have an additional notion of "aspect" to select one or both.
- Certain texture functions cannot be called conditionally, i.e. inside an
if. - Copying from one texture to another doesn't work between certain formats and aspects.
My strategy so far has been to try and stick to native WGSL semantics as much as possible, meaning the shader code you do write gets inserted pretty much verbatim. But if you wanted to paper over all these differences, you'd have to invent a whole new shader dialect. This is a huge effort which I have not bothered with. As a result, compute vs render pretty much have to remain separate universes, even when they're doing 95% the same thing. There is also no easy way to explain to users which one they ought to use.
While it's unrealistic to expect GPU makers to support every possible format and feature on a fast path, there is little reason why they can't just pretend a little bit more. If a texture format isn't hardware filterable, somebody will have to emulate that in a shader, so it may as well be done once, properly, instead of in hundreds of other hand-rolled implementations.
If there is one overarching theme in this space, it's that limitations and quirks continue to be offloaded directly onto application developers, often with barely a shrug. To make matters worse, the "next gen" APIs like Metal and Vulkan, which WebGPU inherits from, do not improve this. They want you to become an expert at their own kind of busywork, instead of getting on with your own.
I can understand if the WebGPU designers have looked at the resulting venn-diagram of poorly supported features, and have had to pick their battles. But there's a few absurdities hidden in the API, and many non-obvious limitations, where the API spec suggests you can do a lot more than you actually can. It's a very mixed bag all things considered, and in certain parts, plain retarded. Ask me about minimum binding size. No wait, don't.
* * *
Most promising is that as Use.GPU grows to do more, I'm not touching extremely large parts of it. This to me is the sign of good architecture. I also continue to focus on specific use cases to validate it all, because that's the only way I know how to do it well.
There are some very interesting goodies lurking inside too. To give you an example... that R3F client app I mentioned at the start. It leverages Use.GPU's state package to implement a universal undo/redo system in 130 lines. A JS patcher is very handy to wrangle the WebGPU API's deep argument style, but it can do a lot more.
One more thing. As a side project to get away from the core architecting, I made a viewer for levels for Dark Engine games, i.e. Thief 1 (1998), System Shock 2 (1999) and Thief 2 (2000). I want to answer a question I've had for ages: how would those light-driven games have looked, if we'd had better lighting tech back then? So it actually relights the levels. It's still a work in progress, and so far I've only done slow-ass offline CPU bakes with it, using a BSP-tree based raytracer. But it works like a treat.
I basically don't have to do any heavy lifting if I want to draw something, be it normal geometry, in-place data/debug viz, or zoomable overlays. Integrating old-school lightmaps takes about 10 lines of shader code and 10 lines of JS, and the rest is off-the-shelf Use.GPU. I can spend my cycles working on the problem I actually want to be working on. That to me is the real value proposition here.
I've noticed that when you present people with refined code that is extremely simple, they often just do not believe you, or even themselves. They assume that the only way you're able to juggle many different concerns is through galaxy brain integration gymnastics. It's really quite funny. They go looking for the complexity, and they can't find it, so they assume they're missing something really vital. The realization that it's simply not there can take a very long time to sink in.
Visit usegpu.live for more and to view demos in a WebGPU capable browser.