
Hello World on the GPU
An Easy Tutorial
Graphics programming can be intimidating. It involves a fair amount of math, some low-level code, and it's often hard to debug. Nevertheless I'd like to show you how to do a simple "Hello World" on the GPU. You will see that there is in fact nothing to be afraid of.
Most environments offer you a printf-equivalent and a string type, but that's not how we do things in GPU land. We like the raw stuff, and we work with pixels themselves. So we're going to draw our text to the console directly. I'll show you the general high level flow, and then wrap up some of the details.
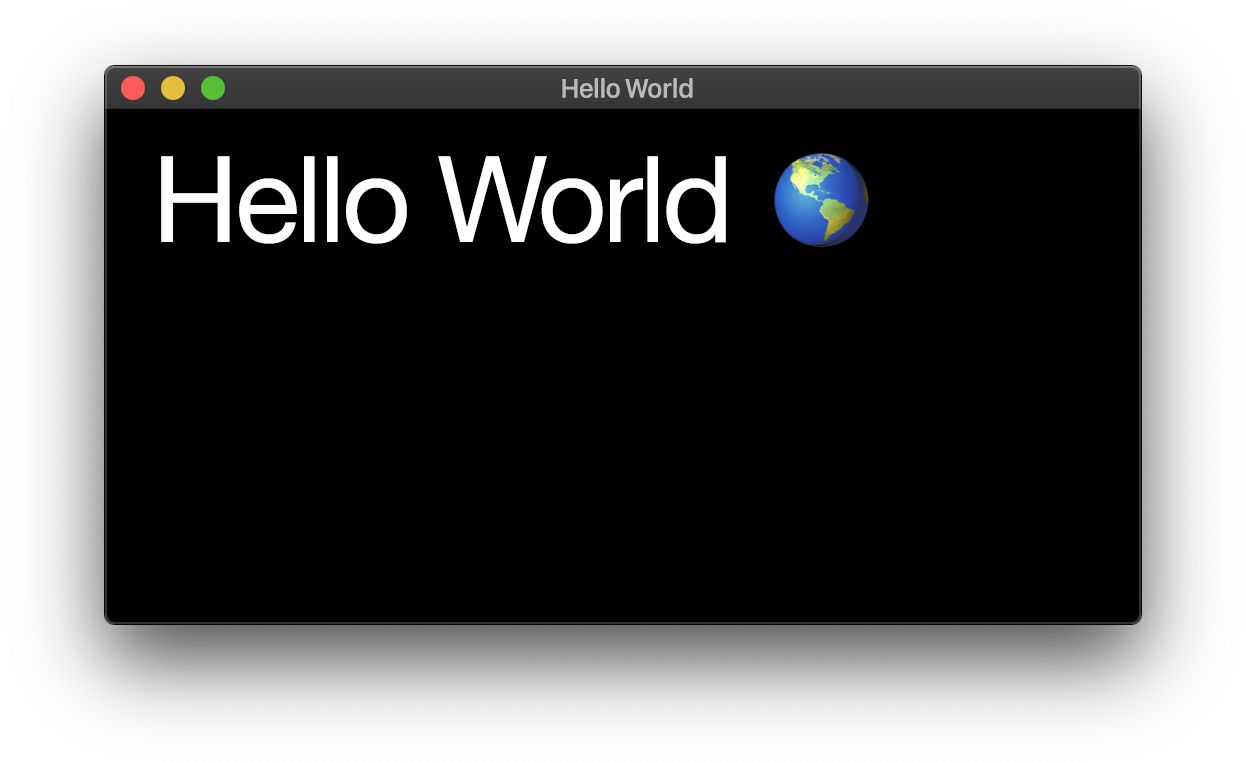
First, we're going to define our alphabet.
let alphabet = allocate_values(
  &['H', 'E', 'L', 'O', 'W', 'R', 'D', '🌎'],
  AlphabetFormat::Letter);
Next we define our message by encoding it from this alphabet.
let message = allocate_indices(
//  H  E  L  L  O  W  O  R  L  D
  &[0, 1, 2, 2, 3, 4, 3, 5, 2, 6, 7],
  IndexFormat::Uint8);
We'll also need to assemble this alphabet soup into positioned text. Don't worry, I precalculated the horizontal X offsets:
let xs = allocate_values(
  &[0.0, 49.0, 130.0, 195.0, 216.0, 238.0, 328.0, 433.0, 496.0, 537.0, 561.0, 667.0],
  AlphabetFormat::Float);
The font is loaded as glyphs, a map of glyph images:
let glyphs = console.load_glyphs("helvetica.ttf");We now have everything we need to print it pixel-by-pixel to the top of the console, which we call 'rasterizing':
fn hello_world(
  line: Line,
  message: Vec<Index>,
  alphabet: Vec<Letter>,
  xs: Vec<Float>,
  args: Vec<Argument>,
) {
  // Get glyph library
  let glyphs = args[0];

  // Loop over all the indices in the message
  for i in 0..message.len() {

    // Retrieve the x position for this index.
    let x = xs[i];

    // Retrieve the letter in the alphabet
    let letter = alphabet[message[i]];

    // Retrieve the glyph image for this letter
    let glyph  = glyphs[letter];

    // Rasterize it to the line
    rasterize(line, x, glyph.image, glyph.width, glyph.height);
  }
}
rasterize() is provided for you, but if you're curious, this is what it looks like on the inside:
fn rasterize(
  line: Line,
  offset: Float,
  image: Frame,
  width: Int,
  height: Int
) {

  // Iterate over rows and columns
  for y in 0..height {
    for x in 0..width {

      // Get target position
      let tx = x + offset;
      let ty = y;

      // Get image pixel color
      let source = get(image, x, y);

      // Get current target pixel color
      let destination = get(line, tx, ty);

      // Blend source color with destination color
      let blended = blend(source, destination);

      // Save new color to target
      set(target, tx, ty, blended);
    }
  }
};
It's just like blending pixels in Photoshop, with a simple nested rows-and-columns loop.
Okay so I did gloss over an important detail.
The thing is, you can't just call hello_world(...) to run your code. I know it looks like a regular function, just like rasterize(), but it turns out you can only call built-in functions directly. If you want to call one of your own functions, you need to do a little bit extra, because the calling convention is slightly different. I'll just go over the required steps so you can follow along.
First you need to actually access the console you want to print to.
So you create a console instance:
let instance = Console::Instance::new();and get an adapter from it:
let adapter =
  instance.get_adapter(
    &AdapterDescriptor {
      font_preference: FontPreference::Smooth,
    });
so you can get an actual console:
let console =
  adapter.create_console(
    &ConsoleDescriptor {
      extensions: Extensions {
        subpixel_antialiasing: true,
      },
    });
But this console doesn't actually do anything yet. You need to create an interactive window to put it in:
let events_loop = EventsLoop::new();

let window = WindowBuilder::new()
  .with_dimensions(LogicalSize {
    width: 1280.0, height: 720.0
  })
  .with_title("Console")
  .build(&events_loop).unwrap();
and then make a surface to draw to:
let surface = instance.create_surface();Now if you want to print more than one line of text, you need to set up a line feed:
let descriptor =
  LineFeedDescriptor {
    usage: LineUsageFlags::OUTPUT_ATTACHMENT,
    format: TextFormat::UTF8,
    width: 120,
    height: 50,
  };

let line_feed = console.create_line_feed(&surface, &descriptor);

let next_line = line_feed.get_next_line();
And if you want emoji, which we do, you need a separate emoji buffer too:
let images =
  console.create_emoji(
    EmojiDescriptor {
      size: Extent2d {
        width: 256,
        height: 256,
      },
      array_size: 1024,
      dimension: ImageDimension::D2,
      format: ImageFormat::RGBA8,
      usage: ImageUsageFlags::OUTPUT_ATTACHMENT,
    });

let emoji_buffer = images.create_default_view();
Okay, we're all set!
Now we just need to encode the call, using a call encoder:
let encoder = console.create_call_encoder();We begin by describing the special first argument (line), a combo of next_line and the emoji_buffer. We also have to provide some additional flags and parameters:
let call =
  encoder.encode_function_call(
    FunctionCallDescriptor {
      console_attachments: &[
        ConsoleAttachmentDescriptor {
          attachment: &next_line,
          load_op: LoadOp::Clear,
          store_op: StoreOp::Store,
          clear_letter: ' ',
        }
      ],
      emoji_attachment: Some(
        ConsoleEmojiAttachmentDescriptor {
          attachment: &emoji_buffer,
          load_op: LoadOp::Clear,
          store_op: StoreOp::Store,
          clear_color: "rgba(0, 0, 0, 0)",
        })
    });
The message of type Vec<Index> is added using a built-in convention for indices:
call.set_index_buffer(message);The alphabet: Vec<Letter> and the xs: Vec<Float> can also be directly passed in, because they are accessed 1-to-1 using our indices, as numbered arguments:
call.set_alphabet_buffers(&[
  (&alphabet, 0), (&xs, 1)
]);
However, the glyph images are a bit trickier, as they are a custom keyword argument.
To make this work, we need to create an argument group layout, which describes how we'll pass the arguments to sample our glyph images:
let argument_group_layout =
  console.create_argument_group_layout(
    &ArgumentGroupLayoutDescriptor {
      bindings: &[
        ArgumentGroupLayoutBinding {
            binding: 0,
            visibility: Visibility::PIXEL,
            ty: BindingType::SampledText,
        },
        ArgumentGroupLayoutBinding {
            binding: 1,
            visibility: Visibility::PIXEL,
            ty: BindingType::Sampler,
        },
      ]
    });
We then put it into a larger function call layout, in case we have multiple groups of keyword arguments:
let function_call_layout =
  console.create_function_call_layout(
    FunctionCallLayoutDescriptor {
      argument_group_layouts: &[argument_group_layout],
    });
We also need to create bindings to match this layout, to actually bind our argument values:
let glyph_view = glyphs.create_default_view();

let sampler = console.create_sampler(
  &TextSamplerDescriptor {
    address_mode: AddressMode::ClampToEdge,
    text_filter: FilterMode::TypeHinted,
    hint_clamp: 100.0,
    max_anisotropy: 4,
    compare_function: CompareFunction::Always,
    border_color: BorderColor::TransparentBlack,
  });

let argument_group =
  console.create_argument_group(
    &BindGroupDescriptor {
      layout: argument_group_layout,
      bindings: &[
        Binding {
          binding: 0,
          resource: BindingResource::ImageView(&glyph_view),
        },
        Binding {
          binding: 1,
          resource: BindingResource::Sampler(&sampler),
        },
      ]
    });
And add it to our call:
call.set_argument_group(0, argument_group);Alright! We're pretty much ready to make the call now. Just one more thing. The function call descriptor.
We need to pass the raw code for hello_world as a string to console.create_code_module, and annotate it with a few extra bits of information:
let function_call =
  console.create_function_call(
    &FunctionCallDescriptor {
      layout: &function_call_layout,
      call_stage: CallStageDescriptor {
        module: console.create_code_module(&hello_world),
        entry_point: "hello_world",
      },
      rasterization_state: RasterizationStateDescriptor {
        emoji_alignment: Alignment::Middle,
        emoji_bias: 0,
        emoji_scale: 1.5,
      },
      text_topology: Topology::Letters,
      console_states: &[
        ConsoleStateDescriptor {
          format: TextFormat::UTF8,
          color: BlendDescriptor {
            src_factor: BlendFactor::SrcAlpha,
            dst_factor: BlendFactor::OneMinusSrcAlpha,
            operation: BlendOperation::Add,
          },
          alpha: BlendDescriptor {
            src_factor: BlendFactor::OneMinusDstAlpha,
            dst_factor: BlendFactor::One,
            operation: BlendOperation::Add,
          },
          write_mask: ColorWriteFlags::ALL,
        },
      ],
      emoji_state: Some(EmojiStateDescriptor {
        format: ImageFormat::RGBA8,
        emoji_enabled: true,
        emoji_variant: CompareFunction::LessEqual,
      }),
      index_format: IndexFormat::Uint8,
      alphabet_buffers: &[
        AlphabetBufferDescriptor {
          stride: 1,
          step_mode: InputStepMode::Letter,
          attributes: AlphabetAttributeDescriptor {
            attribute_index: 0,
            format: AlphabetFormat::Letter,
            offset: 0,
          },
        },
        AlphabetBufferDescriptor {
          stride: 1,
          step_mode: InputStepMode::Letter,
          attributes: AlphabetAttributeDescriptor {
            attribute_index: 1,
            format: AlphabetFormat::Number,
            offset: 0,
          },
        },
      ],
      sample_count: 1,
    });
Which we add to the call:
call.set_function_call(&function_call);Well, you actually have to do this first, but it was easier to explain it last.
Now all that's left is to submit the encoded command to the console queue, and we're already done:
console
  .get_queue()
  .submit(&[encoder.finish()]);
Hm.
Damn, and I was going to show you how to make a matrix letter effect as an encore. You can pass a letter_shader to rasterizeWithLetterFX(...). It's easy, takes a couple hundred lines tops, all you have to do is call a function on a GPU.
(All code in this post is real, but certain names and places have been changed to protect the innocent. If you'd like to avoid tedious bureaucracy in your code, why not read about how the web people are trying to tame similar lions?)