Making Worlds 2 - Scaling Heights
Last time, I had a working, smooth sphere mesh. The next step is to create terrain.
Scale
Though my goal is to render at a huge range of scales, I'm going to focus on views from space first. That strongly limits how much detail I need to store and render. Aside from being a good initial sandbox in terms of content generation, it also means I can comfortably keep using my current code, which doesn't do any sophisticated memory or resource management yet. I'd much rather work on getting something interesting up first rather than work on invisible infrastructure.
That said, this is not necessarily a limitation. The interesting thing about procedural content is that every generator you build can be combined with many others, including a copy of itself. In the case of terrain, there are definite fractal properties, like self-similarity at different levels of scale. This means that once I've generated the lowest resolution terrain, I can generate smaller scale variations and combine them with the larger levels for more detail. This can be repeated indefinitely and is only limited by the amount of memory available.
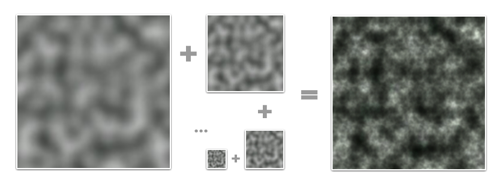 Perlin Noise is a celebrated classic procedural algorithm,
often used as a fractal generator.
Height
To build terrain, I need to create heightmaps for all 6 cube faces. Shamelessly stealing more ideas from Spore, I'm doing this on the GPU instead of the CPU, for speed. The GPU normally processes colored pixels, but there's no reason why you can't bind a heightmap's contents as a grayscale (one channel) image and 'draw' into it. As long I build my terrain using simple, repeated drawing operations, this will run incredibly fast.
In this case, I'm stamping various brushes onto the sphere's surface to create bumps and pits. Each brush is a regular PNG image which is projected onto the surface around a particular point. The luminance of the brush's pixels determines whether to raise or lower terrain and by how much.

Three example brushes from Spore. (source)
However, while the brushes need to appear seamless on the final sphere, the drawing area consists only of the straight, square set of cube map faces. It might seem tricky to make this work so that the terrain appears undistorted on the curved sphere grid, but in fact, this distortion is neatly compensated for by good old perspective. All I need to do is set up a virtual scene in 3D, where the brushes are actual shapes hovering around the origin and facing the center. Then, I place a camera in the middle and take a snapshot both ways along each of the main X, Y and Z directions with a perfect 90 degree field of view. The resulting 6 images can then be tiled to form a distortion-free cube map.
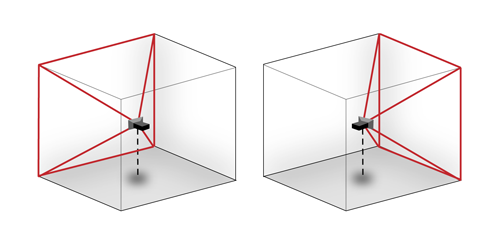 Rendering two different cube map faces. The red area is the camera's viewing cone/pyramid, which extends out to infinity.
To get started I built a very simple prototype, using Ogre's scene manager facilities. I'm starting with just a simple, smooth crater/dent brush. I generate all 6 faces in sequence on the GPU, pull the images back to the CPU to create the actual mesh, and push the resulting chunks of geometry into GPU memory. This is only done once at the beginning, although the possibility is there to implement live updates as well.
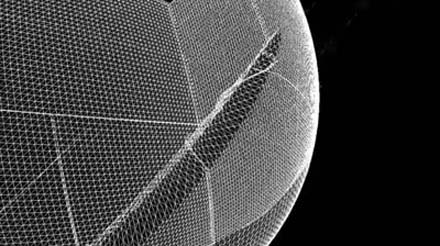
Here's a demo showing a planet and the brushes that created it, hovering over the surface. I haven't implemented any shading yet, so I have to toggle back and forth to wireframe mode so you can see the dents made by the brushes:
The cubemap for this 'planet' looks like this when flattened. You can see that I haven't actually implemented real terrain carving, because brushes cause sharp edges when they overlap:
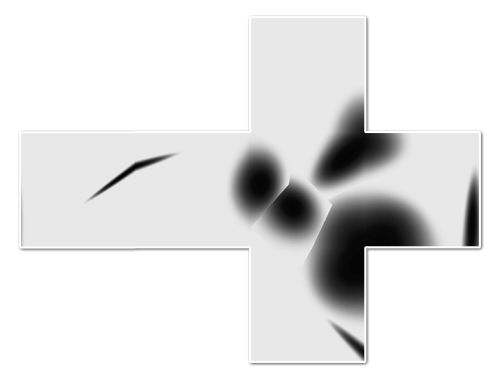
The narrow dent on the left gets distorted and angular where it crosses the cube edge. This is a normal consequence of the cubemapping, as it looks perfectly normal when mapped onto the sphere in the video.
Engine Tweaks
The demo above also incorporates a couple of engine improvements. With a real heightmap in place, I can implement real level-of-detail selection. That means the resolution of any terrain tile is decided based on how much detail would be lost if a simpler tile was used. The flatter a tile, the less detail is necessary. This ensures complex geometry is used only on those sections that really need it. This is great for visual fidelity, but causes a lot of geometry to pop up if sharp ridges are present in the terrain. In this case, my rendering engine was happily trying to push 700k triangles through the GPU per frame. While even my laptop GPU can actually do that at pretty smooth frame rates nowadays, some optimizations are in order to give me some breathing room.
The culprit was that I wasn't really doing any early removal of geometry that was hidden or otherwise out of frame. To fix that, I now do visibility checks together with the level-of-detail selection. First it checks if a chunk is over the horizon or not before considering it for selection. This is easy to calculate and eliminates a lot of unnecessary drawing, especially when looking straight down. If that first visibility check passes, I perform a tighter check using the camera's viewing cone. With these two measures in place, I'm only averaging about 50,000-100,000 triangles visible per frame, with room for more optimization. These optimizations only remove geometry that's already off screen, so there is no visual difference.
Cubemap Seams and Dilation
When rendering into cube maps, each side is rendered independently. In theory each face should match perfectly with adjacent ones due to the way they've been created. In practice however, slight mismatches can occur due to rounding errors at the edges, creating seams. This can be fixed by explicitly copying one pixel-wide edges from one face into the adjacent ones, until they all match up.
The next big step is to start shading the surface, but in order to do that I need to be able to run filters on the cube map. Specifically, I need to be able to compare neighbouring height samples anywhere on the surface. In the straight forward cubemap scenario this is non-trivial, because neighbouring samples at the edges need to be fetched from different cube faces at different orientations in space.
I decided to implement something I call 'dilated cubemaps'. I've never really heard this described formally, though I doubt it's never been thought of before:
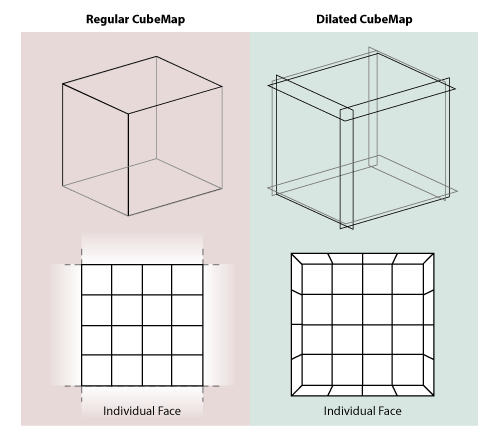
Instead of every face neatly matching with the next, I dilate the cube faces so they stick through eachother. At the same time, I use a larger texture size to compensate, and I adjust the field-of-view of the rendering camera to match. If done right, the resulting cubemap is a pixel-perfect expanded version of the undilated map.
The dilated cubemap provides reliable neighbouring samples for all samples in the original cube map up to a distance as wide as the new border. Unlike regular cubemap wrapping, the dilated regions are distorted to conform to the current face's grid. This matches the real change in grid direction that occurs on the final sphere mesh and lets you sample exactly across cube map edges.
I played with the cubemap dilation because I was thinking of some complicated filters to run that require regular grids (like CFD). But in retrospect, I probably don't need the exact spacing of sample points at the edges for this, so regular undilated cubemapping will probably do. Still, it's good to have around, and certainly was an interesting exercise in pixel-exact rendering.
What Next?
With basic heightmap generation in place, I can now start putting in some 'tech artist' time to play with various brushes and drawing behaviour. Lighting and shading is another big one and should provide a massive improvement to the visuals.
Right now I've taken a week between postings, though it remains to be seen whether I can maintain that. Creating these blog entries is turning into a pretty time consuming endeavour, especially as I get into territory where I have to make my own diagrams and illustrations.
References
The techniques I used were pioneered by people smarter and older than me, I'm just building my own little digital machine with them.
- Creating Spherical Worlds, Maxis/Electronic Arts. (source).
- Ken Perlin, who invented a lot of this stuff.